Setting up your GhostTube Lens headset

GhostTube Lens is a virtual reality headset that you can use with your compatible Android or Apple device while using GhostTube SEER. This article will guide you through how to set up and use your GhostTube Lens with GhostTube SEER for the most comfortable virtual reality experience.
Adjusting the head straps
The first thing we recommend doing is adjusting the head straps for your head size until you can comfortably wear the headset. Remember that if you wear your hair in a bob or pony tail, you may need to adjust your head straps even further than usual. There are three head straps to adjust - one on the left, one on the right, and one on top.
Accessing VR mode
Open up the GhostTube SEER app on your device and look for the VR icon (see below). You will see the splash screen for GhostTube Lens appear where you can purchase a set of GhostTube Lens if you need, access additional settings, or begin your VR experience.

Advanced settings
If you haven't done so already, tap the settings button in the top right corner. On this screen you can adjust your inter-pupillary distance (IPD) or adjust other settings if you're using another headset. Your IPD is the distance between your eyes and is the most important setting. You can find out your IPD from an optometrist or use any free IPD measuring app to measure your eye distance. Adjusting this setting incorrectly could lead to an uncomfortable VR experience or eye strain. Go back to the splash screen and tap "ready" to indicate that you're ready to proceed.

Safety instructions
It is important to read and familiarize yourself with the safety instructions before each use. Once you are ready to proceed, you'll be instructed to rotate your phone into landscape mode and insert it into the GhostTube Lens headset.

Inserting the phone
When prompted to insert your phone, turn your device anti-clockwise into a landscape position. Align the white line displayed on the screen with the center point arrow on the GhostTube Lens headset. Push the device all the way in to the headset until it can't go any further. Ensure it is inserted flat to avoid an uncomfortable virtual reality experience. You can now put the GhostTube Lens headset on your head.


GhostTube Lens supports big and small devices (up to 7 inches size, diagonally). For some larger sized devices you may need to remove the oversized screen tray (pictured below) to fit into the headset. This isn't necessary for all devices.

Adjusting the lens distance (fixing double vision)
If the image you're seeing seems like its in double vision, then it means the lenses in GhostTube Lens are too far apart or too close together for your eyes. Use the dial on the top of the headset to adjust the lens further apart or closer together until things seem less like they're in double vision. Once things seem like they're not in double vision any more it's time to adjust the focus to make it less blurry. See image below.

Adjusting the screen distance (fixing blurry vision)
If the image you're seeing seems like its blurry or hard to focus, then it means the phone is too close or too far away from the lenses for your eyes. Use the pull-out switches on the bottom of the headset to pull the phone tray further away or to bring them closer. Adjust until the image is clear. See image below.

Navigating while wearing GhostTube Lens
If your phone has no gyroscope, you won't be able to navigate while wearing the headset. If you want to record or change stimuli, you will need to remove the phone from the headset and use your finger to tap the navigation buttons as pictured below.

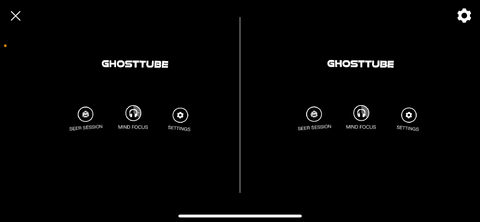
If your phone has a gyroscope, you should be able to look around and navigate to the main menu while wearing the headset. Look down at the "ready" button for a few seconds to access the menu and switch between the different modes. Look down at any time to access navigation controls (such as to record, change visual stimuli, return to the menu etc). Simply gaze at a button for a few seconds to navigate. See the main menu pictured below.